



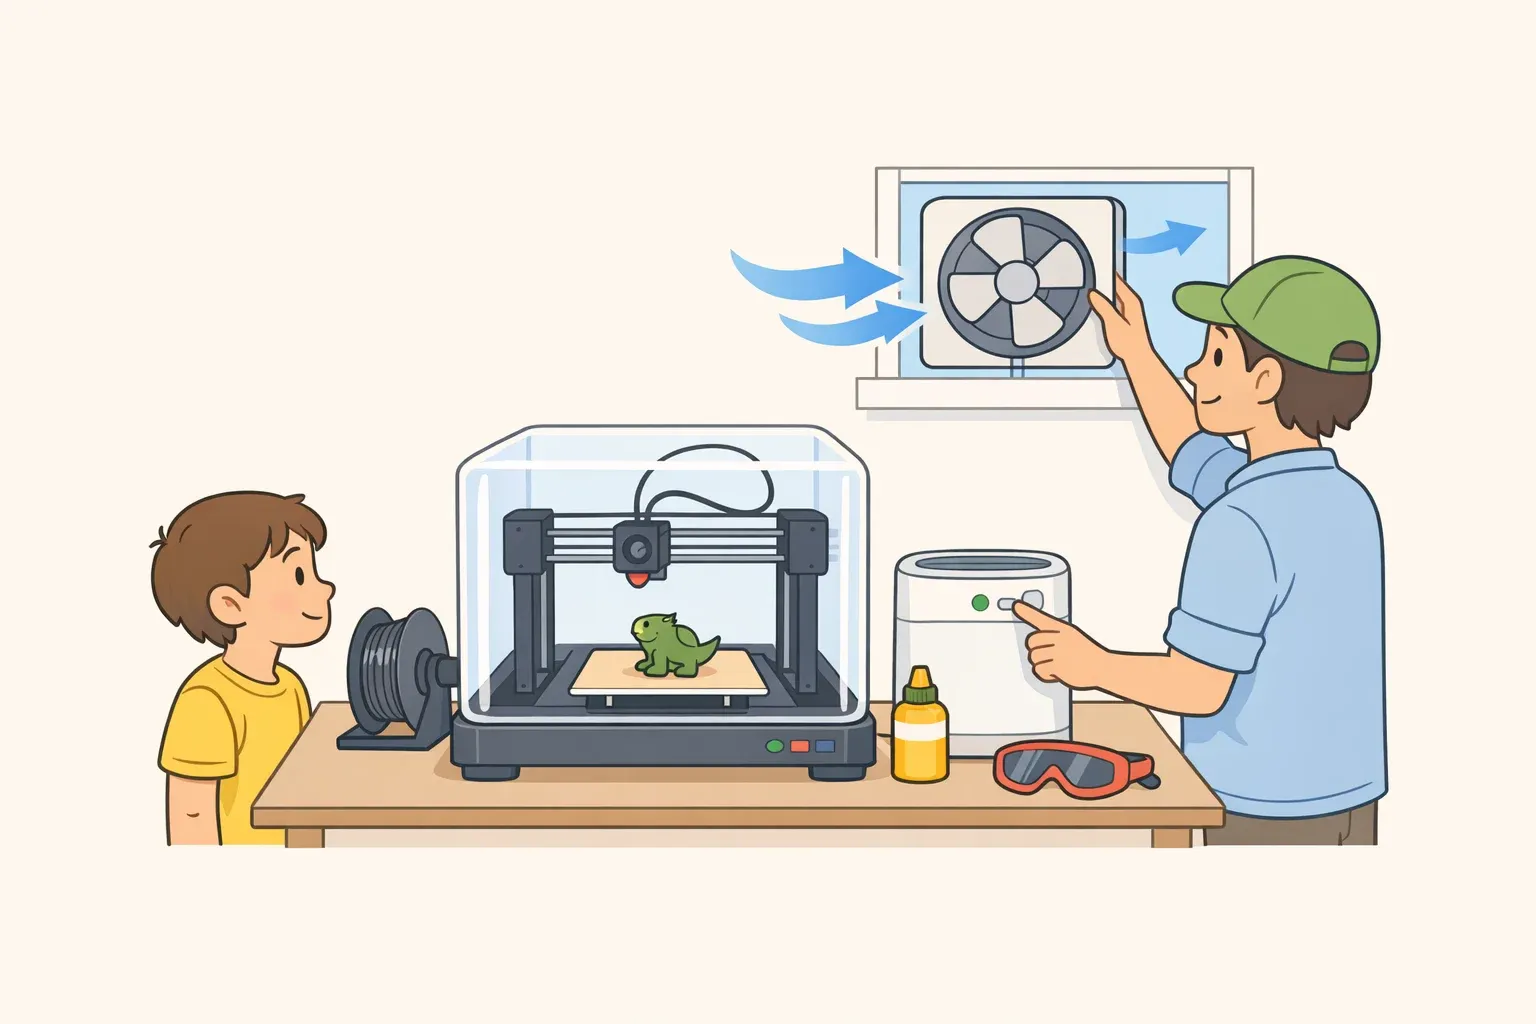
Consumer 3D printers are easier to set up than they used to be, but choosing one for a child still requires more than finding the simplest app or lowest price. In a June 26, 2026 WIRED review, an 11-year-old was downloading slicer files and printing phone stands within 30 minutes, but the bigger question for families is whether the child, workspace, material, and supervision plan are ready.
Finding the right 3D printer for kids means matching the printer to the child's patience, skill level, workspace, and safety setup.
Buy one for a child who already wants one and has a suitable place to use it. Do not buy one hoping it will create interest, and do not treat ventilation as an afterthought. A kid-friendly 3D printer can be a great tool for hands-on projects, but it is still a machine that melts plastic, runs hot, and needs adult oversight.
For most families, the safest first 3D printer for a child is a filament-based FDM printer that uses plain PLA, has simple software, and runs in a ventilated space with adult supervision. Skip resin printers for a first kids' setup.
3D printers can emit volatile organic compounds and ultrafine particles while they run. The EPA says children and teenagers may be more vulnerable to these exposures, especially when printers are used in confined spaces such as classrooms and libraries. That does not make a filament printer an automatic no, but it does make placement, ventilation, material choice, and supervision part of the buying decision.
Should you buy a 3D printer for your child?
Start with whether now is the right time, not which model to buy.
Three signs a purchase makes sense:
Your child already has project ideas. If they already know about 3D model libraries, have watched beginner tutorials, or can name things they want to make, that is a better signal than excitement on the day of unboxing.
You have a suitable space. Skip bedrooms, closed playrooms, and rooms where people sleep. Use a stable, temperature-controlled workspace with ventilation, such as a well-ventilated garage, basement, utility room, or room with a window or exhaust setup.
You are willing to handle occasional maintenance. Clogged nozzles, failed prints, filament jams, and replacement parts are part of owning a 3D printer. Younger children should not be expected to troubleshoot hot components or printer failures on their own.
If your child is only vaguely curious, try a library, school, or community makerspace first. Access without ownership lets them test the hobby before you commit to the machine, the space, and the safety setup.
If your home does not have a ventilated place for regular printing, wait. The risk is manageable, but only if you can actually follow the setup rules.
Skip resin printers for casual kids' use at home. Resin printing involves liquid resins, chemical handling, washing, curing, and added exposure risks that are a poor fit for a beginner setup. This guide focuses on filament-based FDM printers, which are the more practical choice for most families buying a first 3D printer.
How to choose a kid-friendly 3D printer
Shop by complexity first, brand second. A younger child needs a printer that limits choices and shortens setup; an older child can handle more slicer software, file management, and troubleshooting.
For younger kids, roughly ages 5 to 8, prioritize simplicity, short print times, and adult-controlled software. Toybox is one clear example of this tier: it is built around a kid-friendly app, quick print options, and a more limited ecosystem. For this age group, limited controls are a safety and usability advantage.
For older elementary-age kids, roughly ages 9 to 11, look for a beginner filament printer with auto-leveling, a removable build plate, straightforward slicer software, and enough flexibility to import files. This is the better fit for kids who want to download models, adjust settings with help, and learn why prints fail.
For preteens and teens, more capable machines can make multicolor or advanced projects possible, but they also raise the software and troubleshooting burden. Choose this tier only if the child is ready to manage slicer settings, files, longer print times, and failed prints with adult backup.
A printer far beyond a child's current skill level often becomes a machine that sits unused.
Best fit by age and readiness
Younger kids: Choose the simplest enclosed or kid-focused printer you can find. Prioritize short prints, simple controls, and parent-managed software.
Older elementary-age kids: Choose a beginner FDM printer with auto-leveling, PLA support, and a simple slicer workflow.
Teens: Consider more capable printers only if they are ready for longer prints, more settings, and more troubleshooting.
Most families: Skip resin, open-frame hobbyist kits, and high-temperature materials for a first kids' printer.
Features that matter most
Enclosure matters. An enclosed printer can help limit access to hot or moving parts, but it is not a substitute for ventilation. NIOSH recommends lower-emission materials, enclosures, ventilation, and less time spent near printers while they run.
Material choice matters even more. Plain PLA is the best beginner default because it generally prints at lower temperatures than ABS and is easier for new users to manage. Do not treat ABS, ASA, nylon, resin, carbon-fiber blends, metal-filled filament, or glow-in-the-dark filament as beginner materials for children. Some require higher temperatures, stronger ventilation, different handling, or more experience.
Print speed matters for younger kids. Short prints are easier to supervise and easier for kids to understand. Larger, denser, or multicolor projects can run for many hours, so do not let a child treat overnight printing as a set-and-forget activity.
Slicer complexity matters. A slicer turns a 3D model into printer instructions. More settings can teach useful skills, but they also create more ways to fail. For younger children, simple software is better than powerful software.
Footprint and noise matter too. Some compact kid-focused printers can fit on a small table, while more capable printers can take up the space of a small appliance. Measure your intended location before buying, and remember that fans, motors, and long print jobs can become annoying in shared living spaces.
Replacement parts matter more than they sound. Nozzles clog, build plates wear out, filament tangles, and failed prints happen. Before buying, check whether nozzles, build plates, filament, and other common parts are easy to find.
Product safety certification matters too. In the U.S., look for a product-safety mark from a Nationally Recognized Testing Laboratory, such as UL or ETL. Outside the U.S., check for the equivalent certification used in your country, and avoid no-name machines with unclear electrical safety information.
Set up the printer before the first project
Place the printer on a stable, heat-resistant surface, then install the maker's app or slicer and run any firmware updates. Load plain PLA, run the printer's calibration or auto-leveling process, and start with a small test print.
Let the nozzle, build plate, and finished object cool before removal. Inspect the print for sharp edges, loose pieces, or weak spots before giving it to a child.
Keep filament dry and stored away from small children and pets. Tangled or brittle filament can cause failed prints, and loose spools can create clutter around a hot machine.
How to reduce 3D printer emissions at home
FDM printers can emit ultrafine particles and volatile organic compounds when they heat filament. PLA is still the better beginner default, but its "biodegradable" label does not mean a running printer is emission-free.
Keep the safety rules simple: use lower-emission materials, keep people away from the running printer, ventilate the room, and supervise children around hot or moving parts.
Do:
Put the printer on a stable, heat-resistant surface in a ventilated, temperature-controlled workspace.
Keep children away from the printer while it runs unless an adult is actively supervising.
Use plain PLA as the beginner default.
Choose an enclosed printer when possible, especially for younger children.
Let the print, nozzle, and build plate cool before removing a finished object.
Follow the printer maker's instructions before opening an enclosure or clearing a failed print.
Do not:
Run the printer in a bedroom, closed playroom, or room with limited airflow.
Let children touch the nozzle, hot end, build plate, or finished part until everything has cooled.
Let hair, sleeves, hoodie strings, scarves, or small fingers near moving parts.
Plug the printer into overloaded power strips or place it near curtains, paper, bedding, or other combustibles.
Allow long prints to run overnight in a closed room where family members are sleeping.
Use resin or specialty filaments in a casual kids' setup.
For filament printers, the safer rule is to let the printer finish, let the part and build plate cool, and avoid opening an enclosure immediately after a job. Clearance time can vary by printer, enclosure, material, and ventilation, so use the manufacturer's instructions as the floor, not the ceiling.
Choose for the child you have, the space you have, and the level of supervision you can realistically provide.
Best beginner tools and resources
Tinkercad: A free browser-based design tool for beginner 3D modeling.
Thingiverse: A searchable library of downloadable 3D models.
Printables: Another large model library with printable projects, community uploads, and collections.
Parents should preview downloaded models before printing. User-uploaded libraries can include designs that are too sharp, too fragile, too small for young children, or not appropriate for kids.
Start with simple objects: bag clips, bookmarks, pencil holders, keychains, board game pieces, replacement knobs, and cable organizers. Avoid projects that create sharp edges, small parts for younger children, food-contact items, safety equipment, or anything that needs to hold weight unless an adult understands the material and design limits. The Consumer Product Safety Commission has warned that 3D-printed consumer products can raise safety concerns, including risks tied to small parts, sharp edges, and products intended for children.
In the first month, focus on the basic cycle: choose a model, slice it, print it, check what failed, adjust, and try again.

Comments
Be the first, drop a comment!